FA7036 - Nuke Sessions with Jon Turner from Framestore (Updated 2/1/16)
- Nov 30, 2015
- 5 min read


Jon Turner from Framestore
The software we used in these sessions is Nuke, which is a visual effects software that several companies such as Framestore, Disney and DreamWorks use.
At Framestore they do not use Adobe After Effects. Instead they use Nuke.
Films are broken down into sequences in preparation for adding visual effects.
Sequences are rotated and shared between different companies.
Special effects are used to make aeroplanes fly and to make fabric move for example.
Nuke can also be used for making pre-visualisation sequences.
The team at Framestore would rather see a full film rather than a showreel.
A showreel of film clips was shown before the instructional part of the session. Jon showed another at the end.
Recent works produced by Framestore include the latest Sainsbury's Christmas advertisement Mog's Christmas Calamity and the title sequence for the most recent Bond film Spectre.
Nuke Instructions
X in Nuke 9X means 'extended toolkit.' It is best used with a graphics tablet and pen.
The main screen is the viewer or workspace.
The first tab below is the node graph. Pressing the R key brings up the file menu.
Choose the files. They appear in the Node graph.
Highlight them and press L. This lays them out in a neat row.

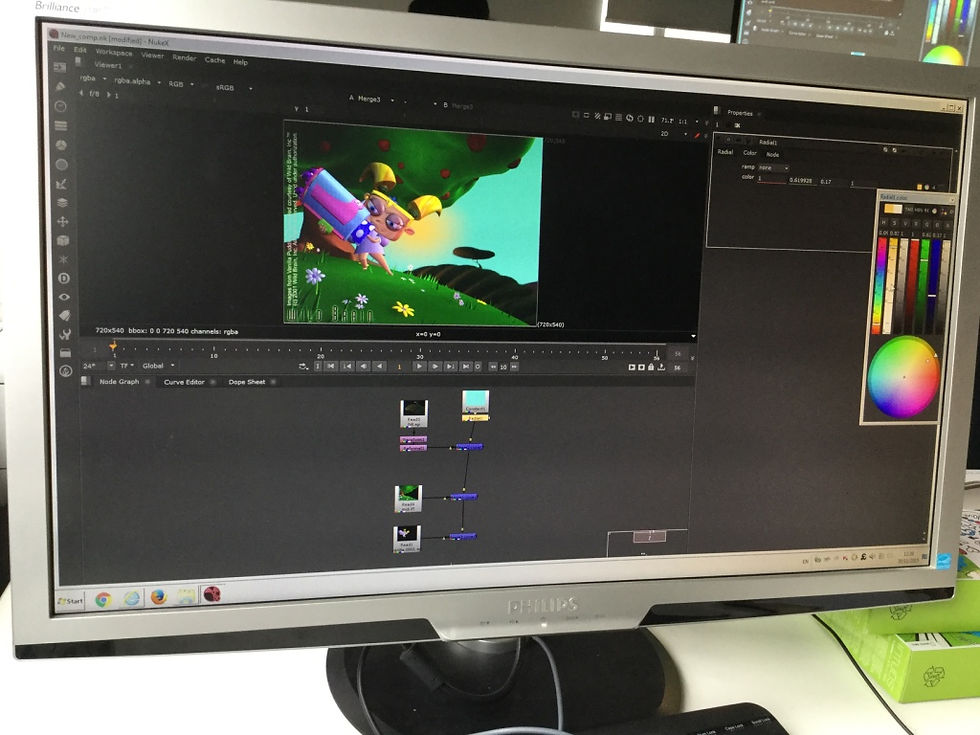
The properties Pane is on the right. Change 10 to 1.
The white outline box is the picture resolution Nuke is working with.
Change the format of the file.
Each image has an alpha channel.
Press M to merge two images. Merge 1 (over) simply means merge 1 image over the other.

Press Shift X to switch layers around.
When clicking on a layer, press Tab to bring up a search menu. Look up reformat and choose it to change the image format.

Make sure reformat in the purple box is connected to Merge 1 (over) and Merge 3 (over) are connected. The tree should be linked to Merge 1 (over) and the girl should be connected to Merge 3 (Over). Once this is done press 1 and all layers will appear in the work space.

To transform the layers for changing their sizes, click on the layer and press T. Alternatively use the controls to resize and move the layer.
To create a flat colour background, press Tab and choose Constant. To bring up the colour bars press control whilst clicking on the colour wheel. Connect it to the Merge 2 (over) box.


Click on the constant, press Tab and search for Radial. A small box appears in the workspace with a light in the middle. Change the colour of the radial to a yellowish orange shade.

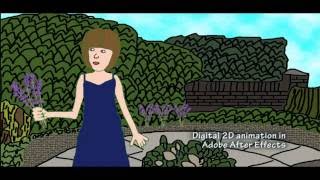
When pressing play, the girl is animated in a loop. She is missing a shadow. The shadow layer is actually her shadow.
Click on the hills and press G. Change the multiplier to 0.5.

Choose rgba.red under mask. Drag the mask arrow to the Grade 2 box. The shadow now moves directly underneath the girl.
To bring up the shuffle menu, click on smoke, click tab and search for shuffle.
To make the smoke white, click on the first three red squares to cross them out.


When playing the animation the smoke is still white and does not look very realistic.
In the Z field, right click and add Expression. Also edit the expression by adding a forward slash and a number.
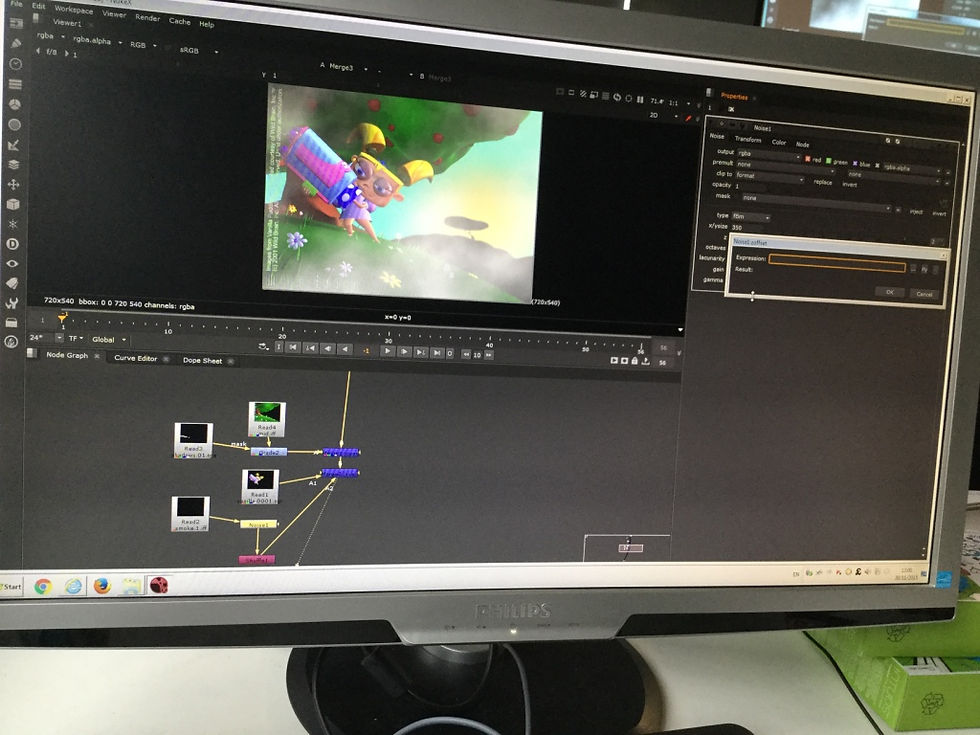
Add Time Offset and minus 1 to noise.

To make the smoke transparent, drag the slider to 0.805 under mix in the merge tab.

The smoke now looks more realistic.
The animated sequence is from the CGI television series Vanilla Pudding (c. 2001 - 2002). It was prodduced by Wild Brain and Egmont and revolves around a little girl who imagines herself as a superhero "to handle the trials and tribulations of growing up." (Godfrey, 2002)
I did not attend the session on 7th December due to illness but I attended the one the week after and learnt the following:
The sequence we worked on had a car on a desert and a smiley face.

The truck moves. Add a motion tracker. To do this press tab and click on Tracker. Connect it to the car in the node graph and choose add track in the Tracker tab. Adjust the tracker. Press the track_to_end button to test the tracking.

Add another tracker to the front of the car.

Translations are the movements of left, right, up and down.
There are text boxes to edit the trackers.

If stabilise is used the car is moving in a more steady manner in the middle.
Only one end moves in a steady pace. This means only one end can be stabilised at a time.
To apply the tracker to the smiley face, unplug it from the truck and add it to the face.
Next choose Reformat under tab, attach it to the face and viewer. Change the format to NTSC.
To make the face move in time with the tracker, look for matchmove.
Merge the truck with the smiley face with the merge1 (over) function.
To make the face smaller, click on reformat, add transform and type 0.1 in the scale box. Use the cross symbol to move the face. Press play. The face should now move in time with the truck.
To stabilise the background duplicate the truck and add additional frackers to it. Stabilise the background by adjusting the settings.
There is a technique called roto, which was covered last week. Cut the truck out to be on a different background. To do this copy and paste the sequence, press tab and search for roto. Connect it to the truck, choose the pencil tool, choose roto and use it to draw around the truck. To add additional lines, click B spline. Draw around the wheels.
When pressing play the line only matches with the first frame.
After lunch, create a black and white image.
Search for CheckerBoard.
Create new file with bus and sign.
Add trackers to the bus.
Add CornerPin to the sign. Merge this with the bus.
Also add trackers to the sign.
Resize the sign to fit on the bus.
Press play. The bus should move with the sign on it.
Camera tracker in red truck
Online Sources
April Slocombe (2015a). Nuke animation 1 [Online video]. Available at: https://www.youtube.com/watch?v=KTmZQZCDJ34 (Accessed: 30th January 2016).
April Slocombe (2015b). Nuke animation 2 [Online video]. Available at: https://www.youtube.com/watch?v=1hZXa0t0Tcg (Accessed: 30th January 2016).
April Slocombe (2015c). Nuke animation 3 [Online video]. Available at: https://www.youtube.com/watch?v=W1_UETcENjo (Accessed: 30th January 2016).
Godfrey, L. (2002). Wild Brain And Egmont Make Pudding [Online]. Availalble at: http://www.awn.com/news/wild-brain-and-egmont-make-pudding (Accessed: 30th January 2016).


Comments